

HDBR Embryonic and Fetal Sample Collection |
Embryo collection
HDBR is a tissue bank regulated by the UK Human Tissue Authority (HTA) and operating in line with the relevant HTA Codes of Practice. Tissue samples are collected with appropriate maternal written consent and approval from the NRES Committee North East - Newcastle and North Tyneside 1 or NRES Committee London-Fulham.
Staging
Difference between gestation and post conception weeks
Clinicians usually refer to a pregnancy in terms of gestation weeks: day one commences with the start of the women’s menstrual period and ovulation and fertilisation occurring during the end of second week/beginning of the third week. Up until this time the woman is not pregnant, and therefore the age of developing embryo or fetus is often described in terms of post conception weeks (PCW) starting from the point at which fertilisation took place. This means there is an approximate 2-week difference between the number of gestation weeks and the post conception weeks of an embryo/fetus. It should be noted however, that both of these terms are not used universally and when referring to PCW sometimes the term gestational weeks will be used interchangeably by different authors. All fetal samples in the HDBR collection are staged as PCW.
Staging guides
HDBR samples are staged according to their external physical appearance and measurements and not to the estimated last menstrual period. All embryonic samples (8 PCW and younger) are classified as belonging to a particular Carnegie stage using the staging guide that can be viewed here and fetal samples using these criteria.
Differences between the age of samples of the same stage
Developmental variability may be observed between samples that have been staged to the same Carnegie stage or to a particular fetal week. Both of these classifications cover a time range during development, not a specific time point. This may be especially apparent if two samples are at the two extremes of a particular stage or week.
Fixation and sectioning |
Tissue is primary fixed in 10% formalin in phosphate buffered saline. After adequate fixation (time varies according to the thickness of the tissue) tissue is either processed, or secondary fixed in Methacarn (60% methanol, 30% chloroform, 10% acetic acid) at 4°C and stored until processing.
For the routine HDBR collection, embryos are processed to paraffin wax and sectioned on a microtome at a thickness of 8µm. Between 1 and 4 sections are mounted per slide, depending on the size of the tissue section. Every ninth section is taken and stained with haematoxylin and eosin in to aid identification of anatomy and selection of stored unstained slides with the appropriate tissues for specific projects.
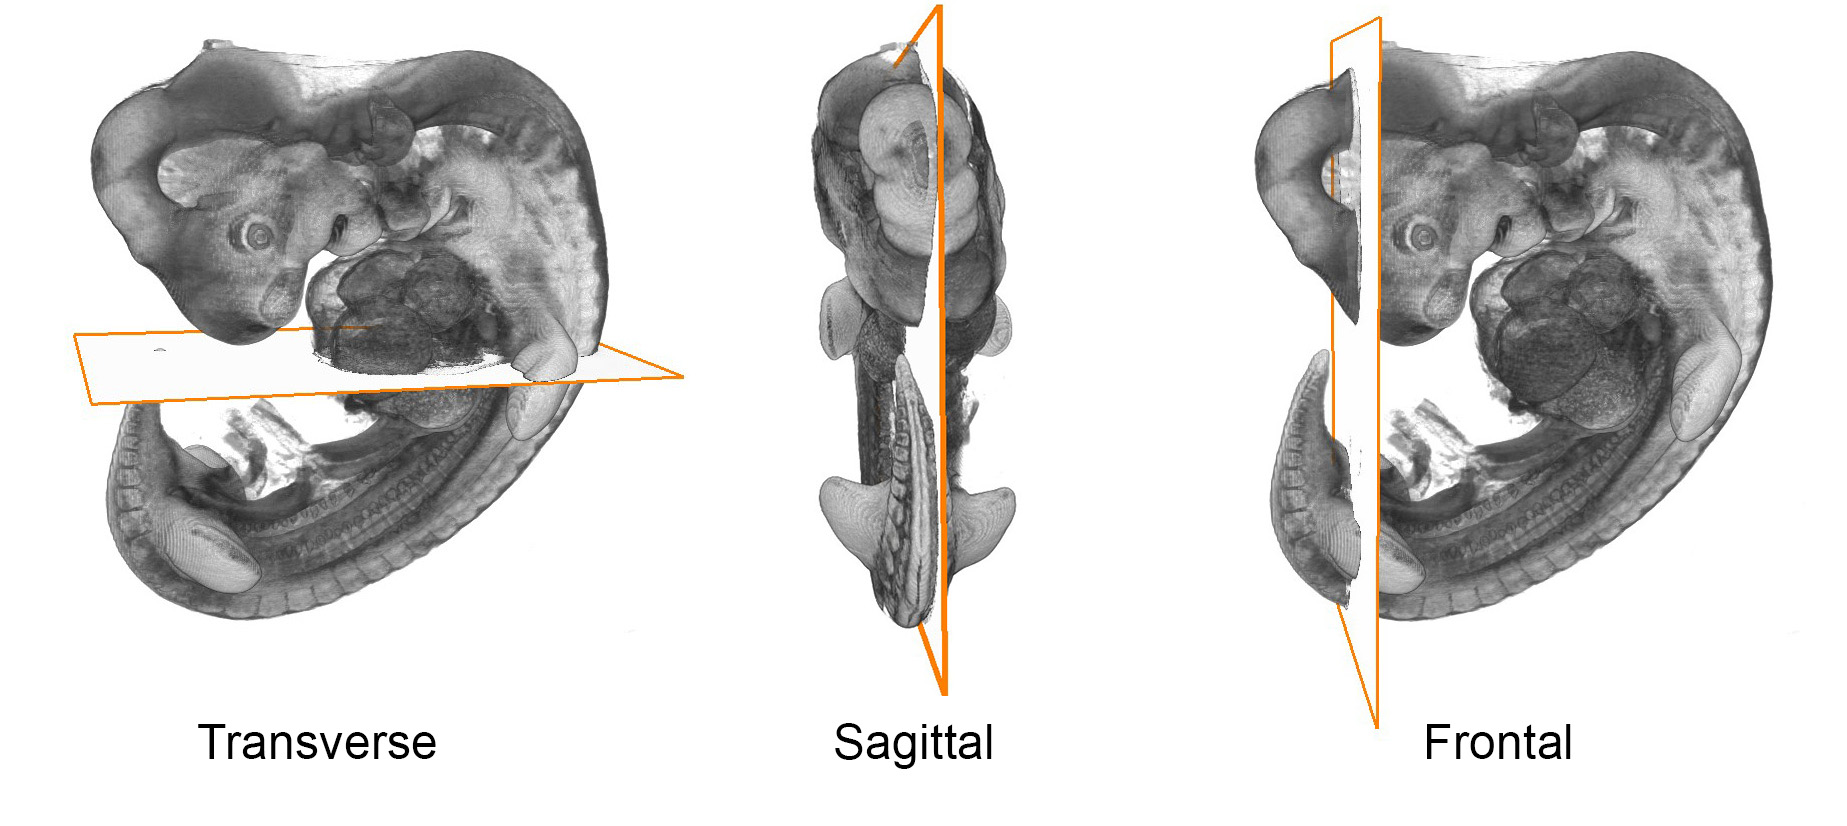
Sections are routinely cut in one of three orthogonal planes, transverse, sagittal or frontal.
Histology |
Haematoxylin and Eosin Staining
Dewax and rehydrate slides.
Stain in Harris haematoxylin for 30-60 seconds and rinse in running tap water.
Blue in Scot’s Tap Water substitute and rinse in running tap water.
Differentiate in 1% acid alcohol until the sections are a moderate peach/orange colour, rinse again in running tap water.
Blue in Scot’s Tap Water substitute. Check nuclear staining under a microscope, repeat differentiation if the nuclei are too dark.
Place in Eosin 60 seconds or longer (exact time determined by a test slide). The pink should not be too bright.
Dehydrate quickly (~3 seconds each) through graded ethanols. Eosin will elute into water/alcohol, so if the eosin is too strong, the dehydration can be slightly slower.
Clear in 2 changes of xylene and mount in DPX.
Solutions:
Harris Haematoxylin (Sigma Aldrich) HS128
Scott’s Tap Water Substitute:
20g Sodium Hydrogen Carbonate
3.5g Magnesium Sulphate
1L distilled water
Scanning
Histology slides are scanned at X20 or X40 magnification on either a Leica SCN400 or Aperio AT2 slide scanner.
3D Reconstructions |
3D models
OPT
Unstained embryos are embedded in a block of low melting point agarose before being dehydrated and cleared in a mixture of Benzyl Alcohol/Benzyl Benzoate.
Autofluorescence is detected using a FITC filter and the data reconstructed into a 3D model according to this paper.
HREM
Embryos, fixed in Bouin’s solution, are embedded in resin and processed according to these protocols:
Embedding
Reconstruction
A video describing the process can be viewed here.
Micro CT
OPT and HREM are useful techniques to produce 3D reconstructions of younger embryonic samples. Larger samples (late embryonic and fetal stages) are scanned using microCT.
Samples are fixed in 10% formalin in PBS. Contrast is enhanced by staining the samples with Lugols iodine (the time varies according to the size of the tissue).
3D datasets are acquired using a Skyscan 1176, Bruker-microCT.
Generation of 3D volumes
To generate the 3D embryo and fetal models, the individual HREM or microCT images are read in as a stack in Amira. The resulting 3D stacks are saved in the Amira .am format.
Amira software is used to visualize and manipulate the 3D volumes. Anatomy is defined by manually segmenting the models, informed by gene expression patterns where possible. Amira is also used to create movies of surface and volume renders.
Interactive models are generated by smoothing the Amira surfaces in Meshlab and resculpting for display using Blender before being rendered in model viewer.